WPML is a popular WordPress plugin that lets you translate your site in multiple languages. You can translate posts, pages, taxonomies, custom content types, and other texts from themes like Traveler. The plugin gives you the choice to translate content automatically using WPML’s proprietary AI, Private Translation Cloud (PTC), or manually through human translators.
We’re proud that Traveler works well with WPML and doesn’t have any compatibility problems. This makes it easy to translate and localize your travel website: https://wpml.org/theme/traveler/
You can follow the document from WPML https://wpml.org/documentation/getting-started-guide/
Go to your WPML Downloads page to download and install the OTGS Installer plugin. This is a lightweight plugin that helps you install all necessary WPML components without having to worry about file sizes.
After installing and activating WPML, go to WPML > Setup to complete the easy setup wizard. There, you’ll add your target languages, choose your URL format, and add information about your site. The site information helps WPML’s AI use the right terminology, tone, and branding when translating.
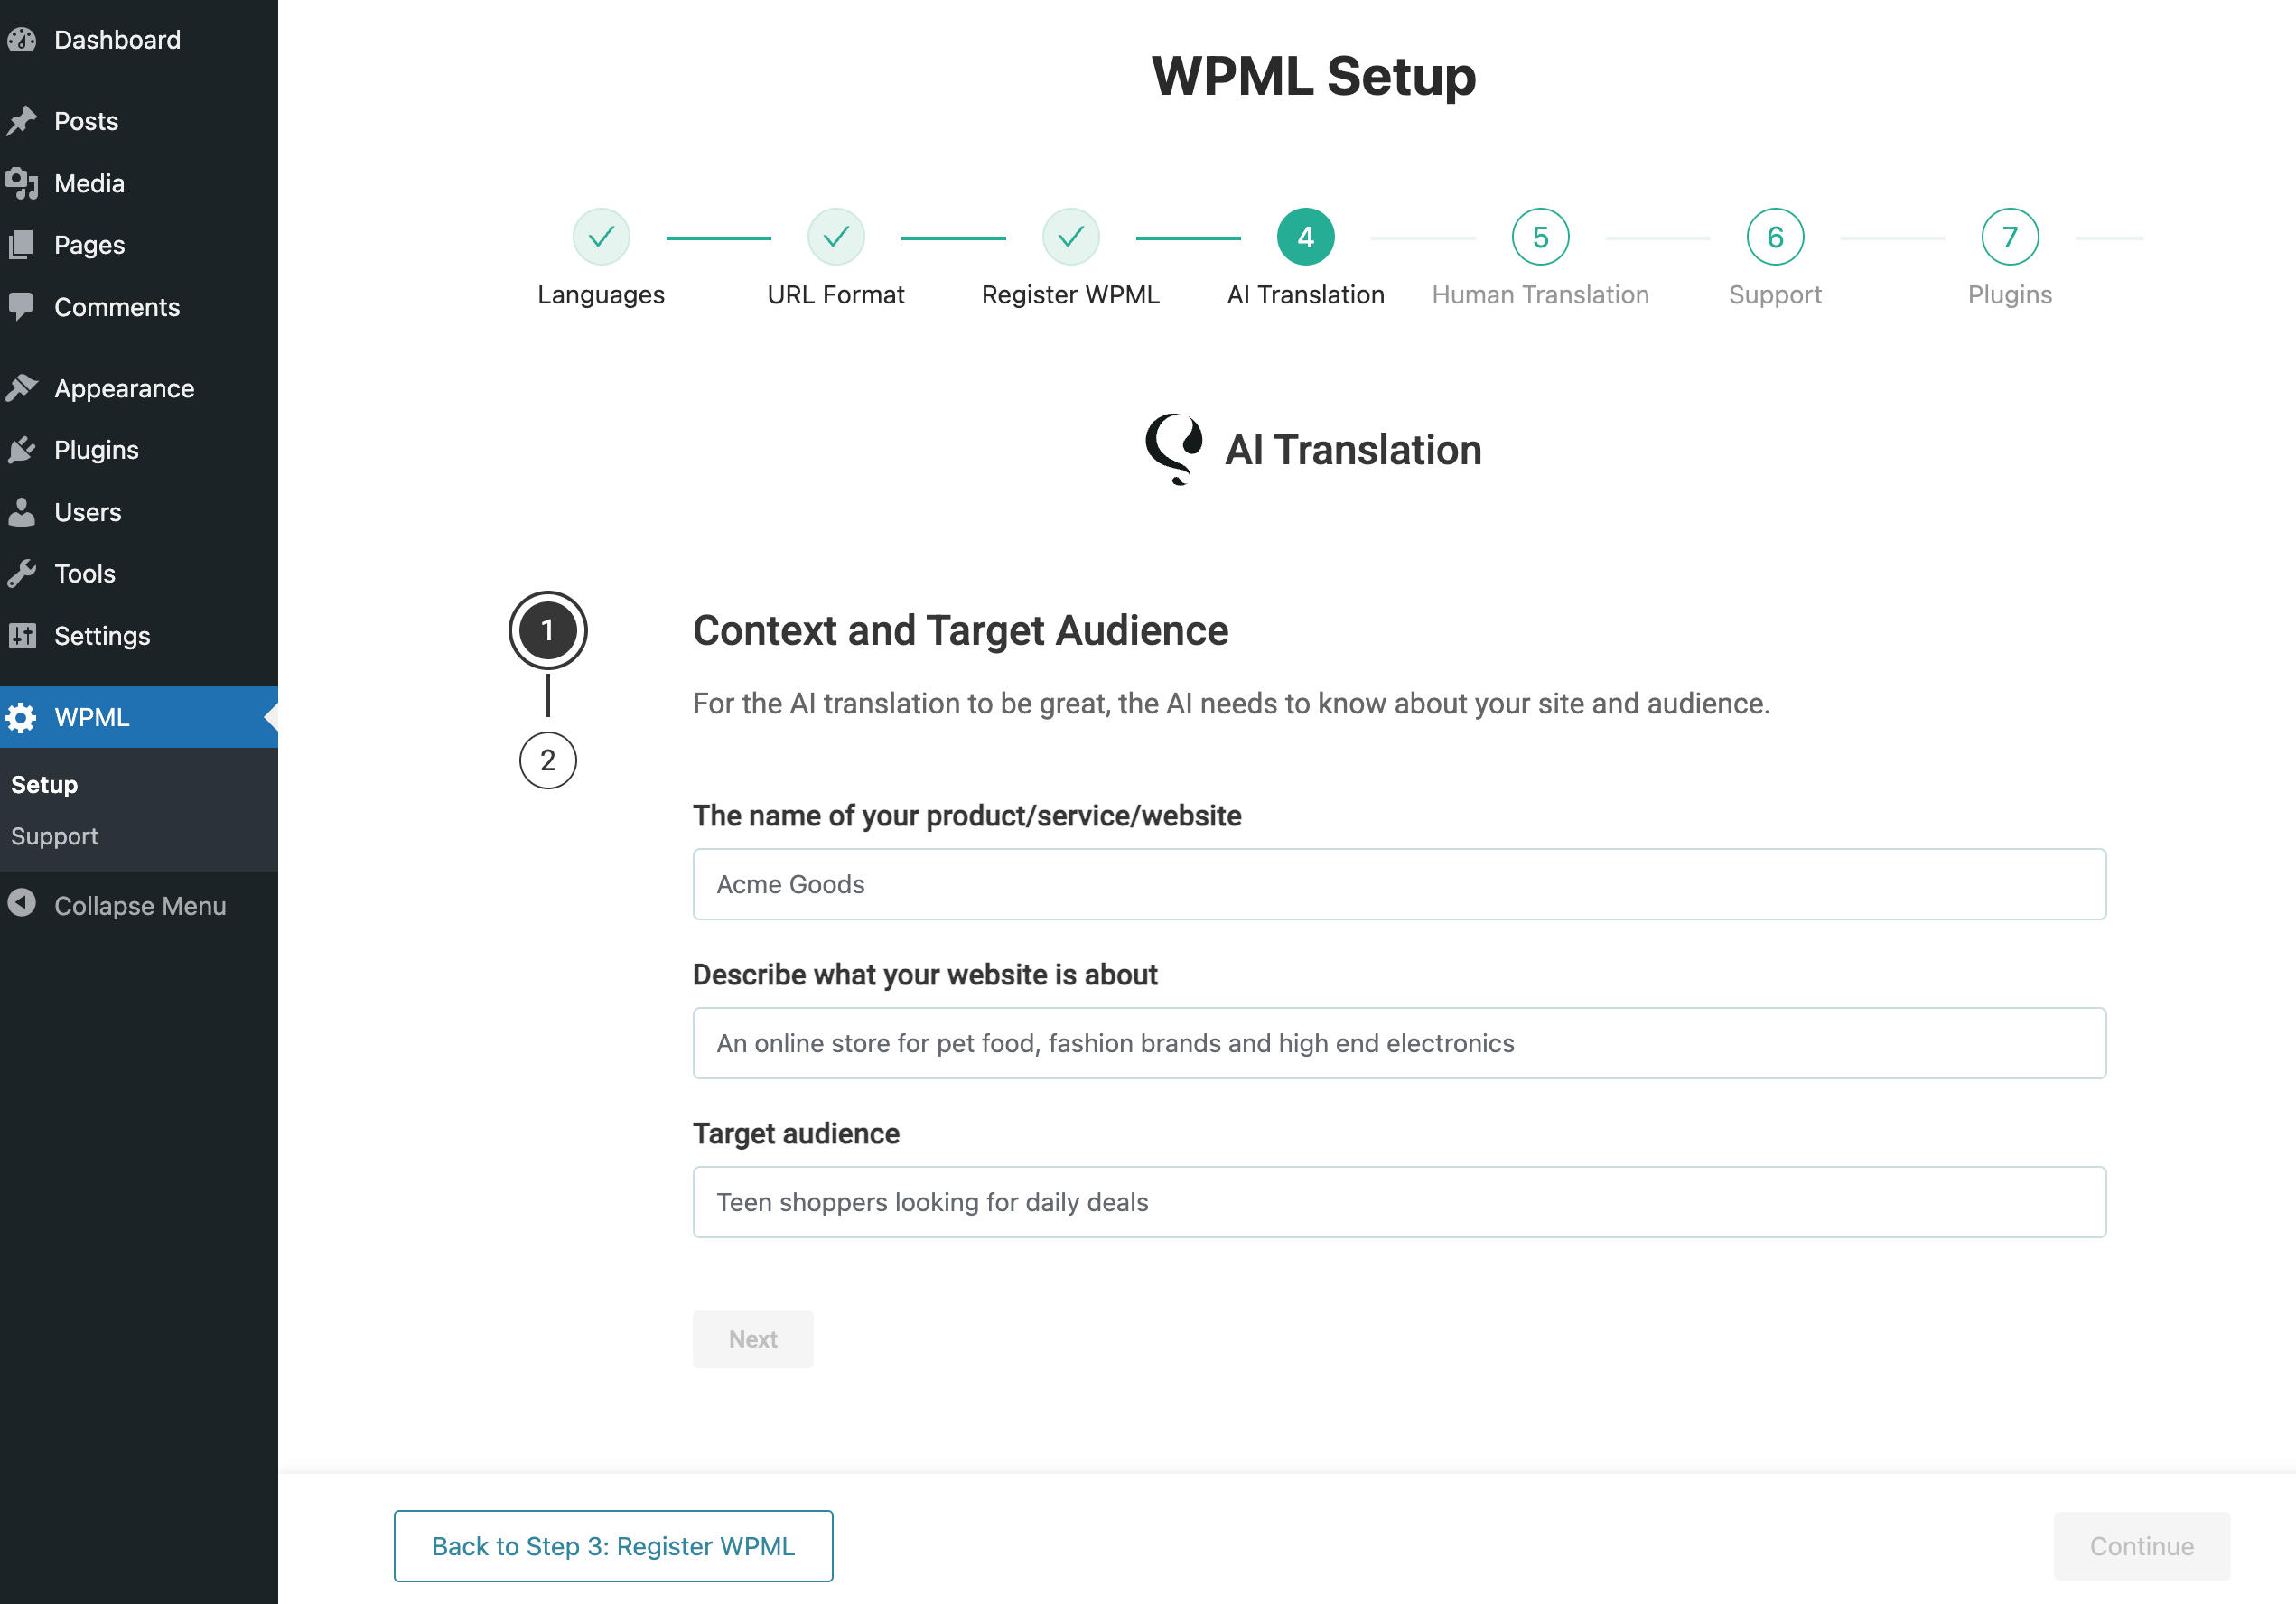
Note #1: The WPAdmin > WPML > Languages > Language URL format must be Different languages in directories. And Store a language cookie to support language filtering for AJAX must be choosen
It is recommended that you first add content to your website in primary language. This will ensure that you have a solid foundation to work with before translating the content into other languages using the WPML plugin
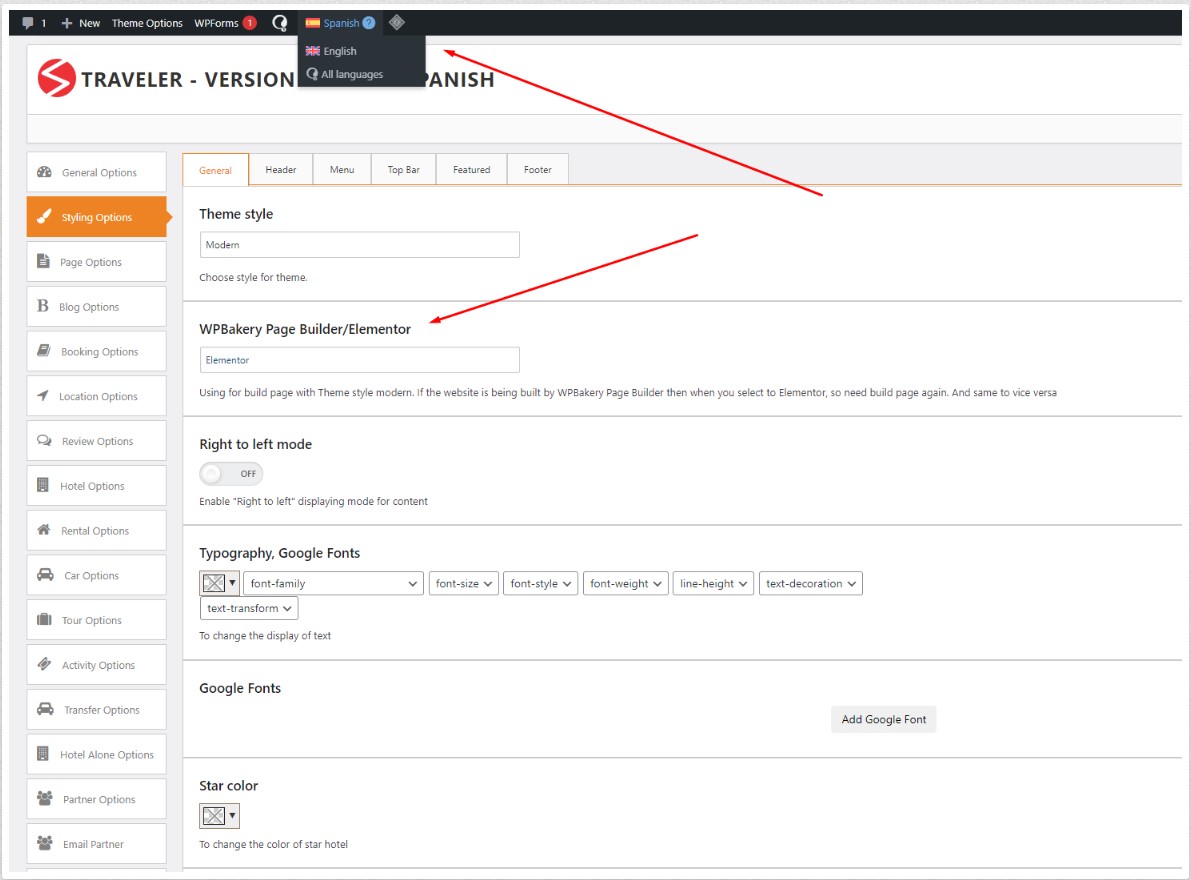
Note #2: After you have installed the WPML Plugin on your website, you will need to configure the theme settings for each language you want to add to your website. For instance, let’s say you want to set up a Spanish language version for your website.
To do this, follow these steps:
For general translation in WPML, you can follow this document https://wpml.org/documentation/getting-started-guide/#translating-with-wpml
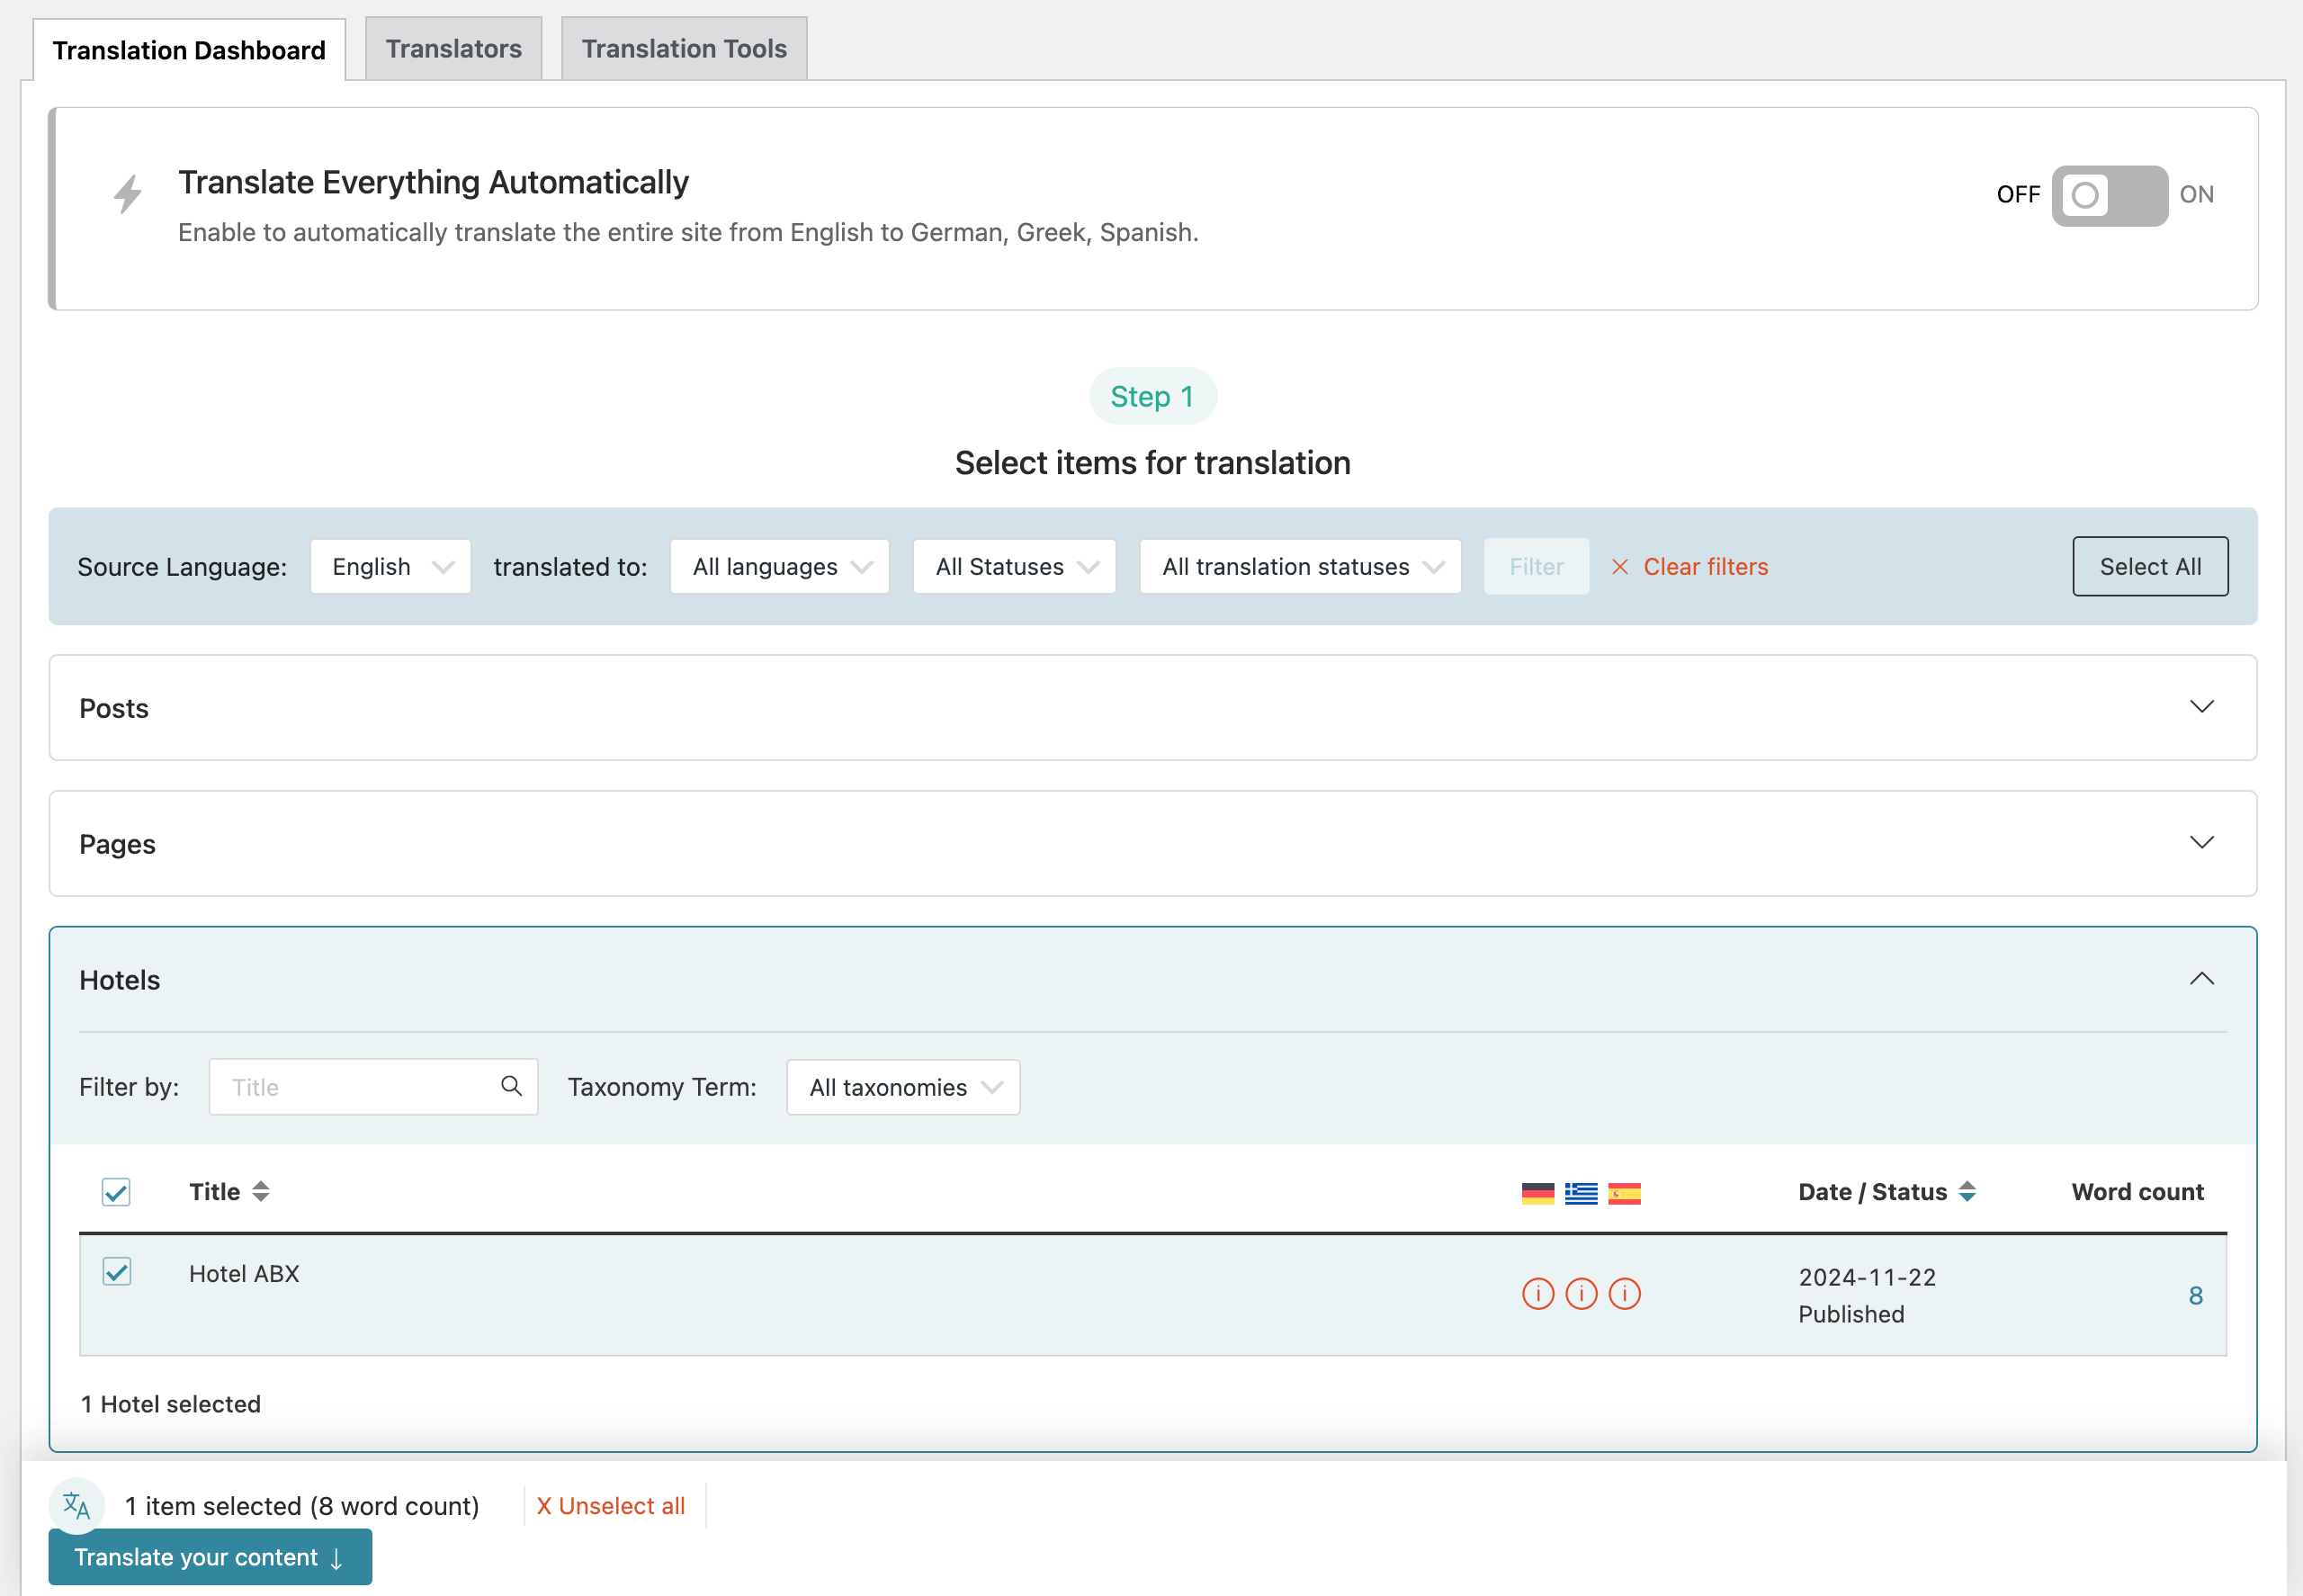
To translate content, go to WPML > Translation Dashboard and look for the sections you want to translate.
Let’s say you want to translate your hotels. Look for the Hotels section and select the hotel pages you want to translate. Then, send them for translation, choosing whether to translate automatically or manually.
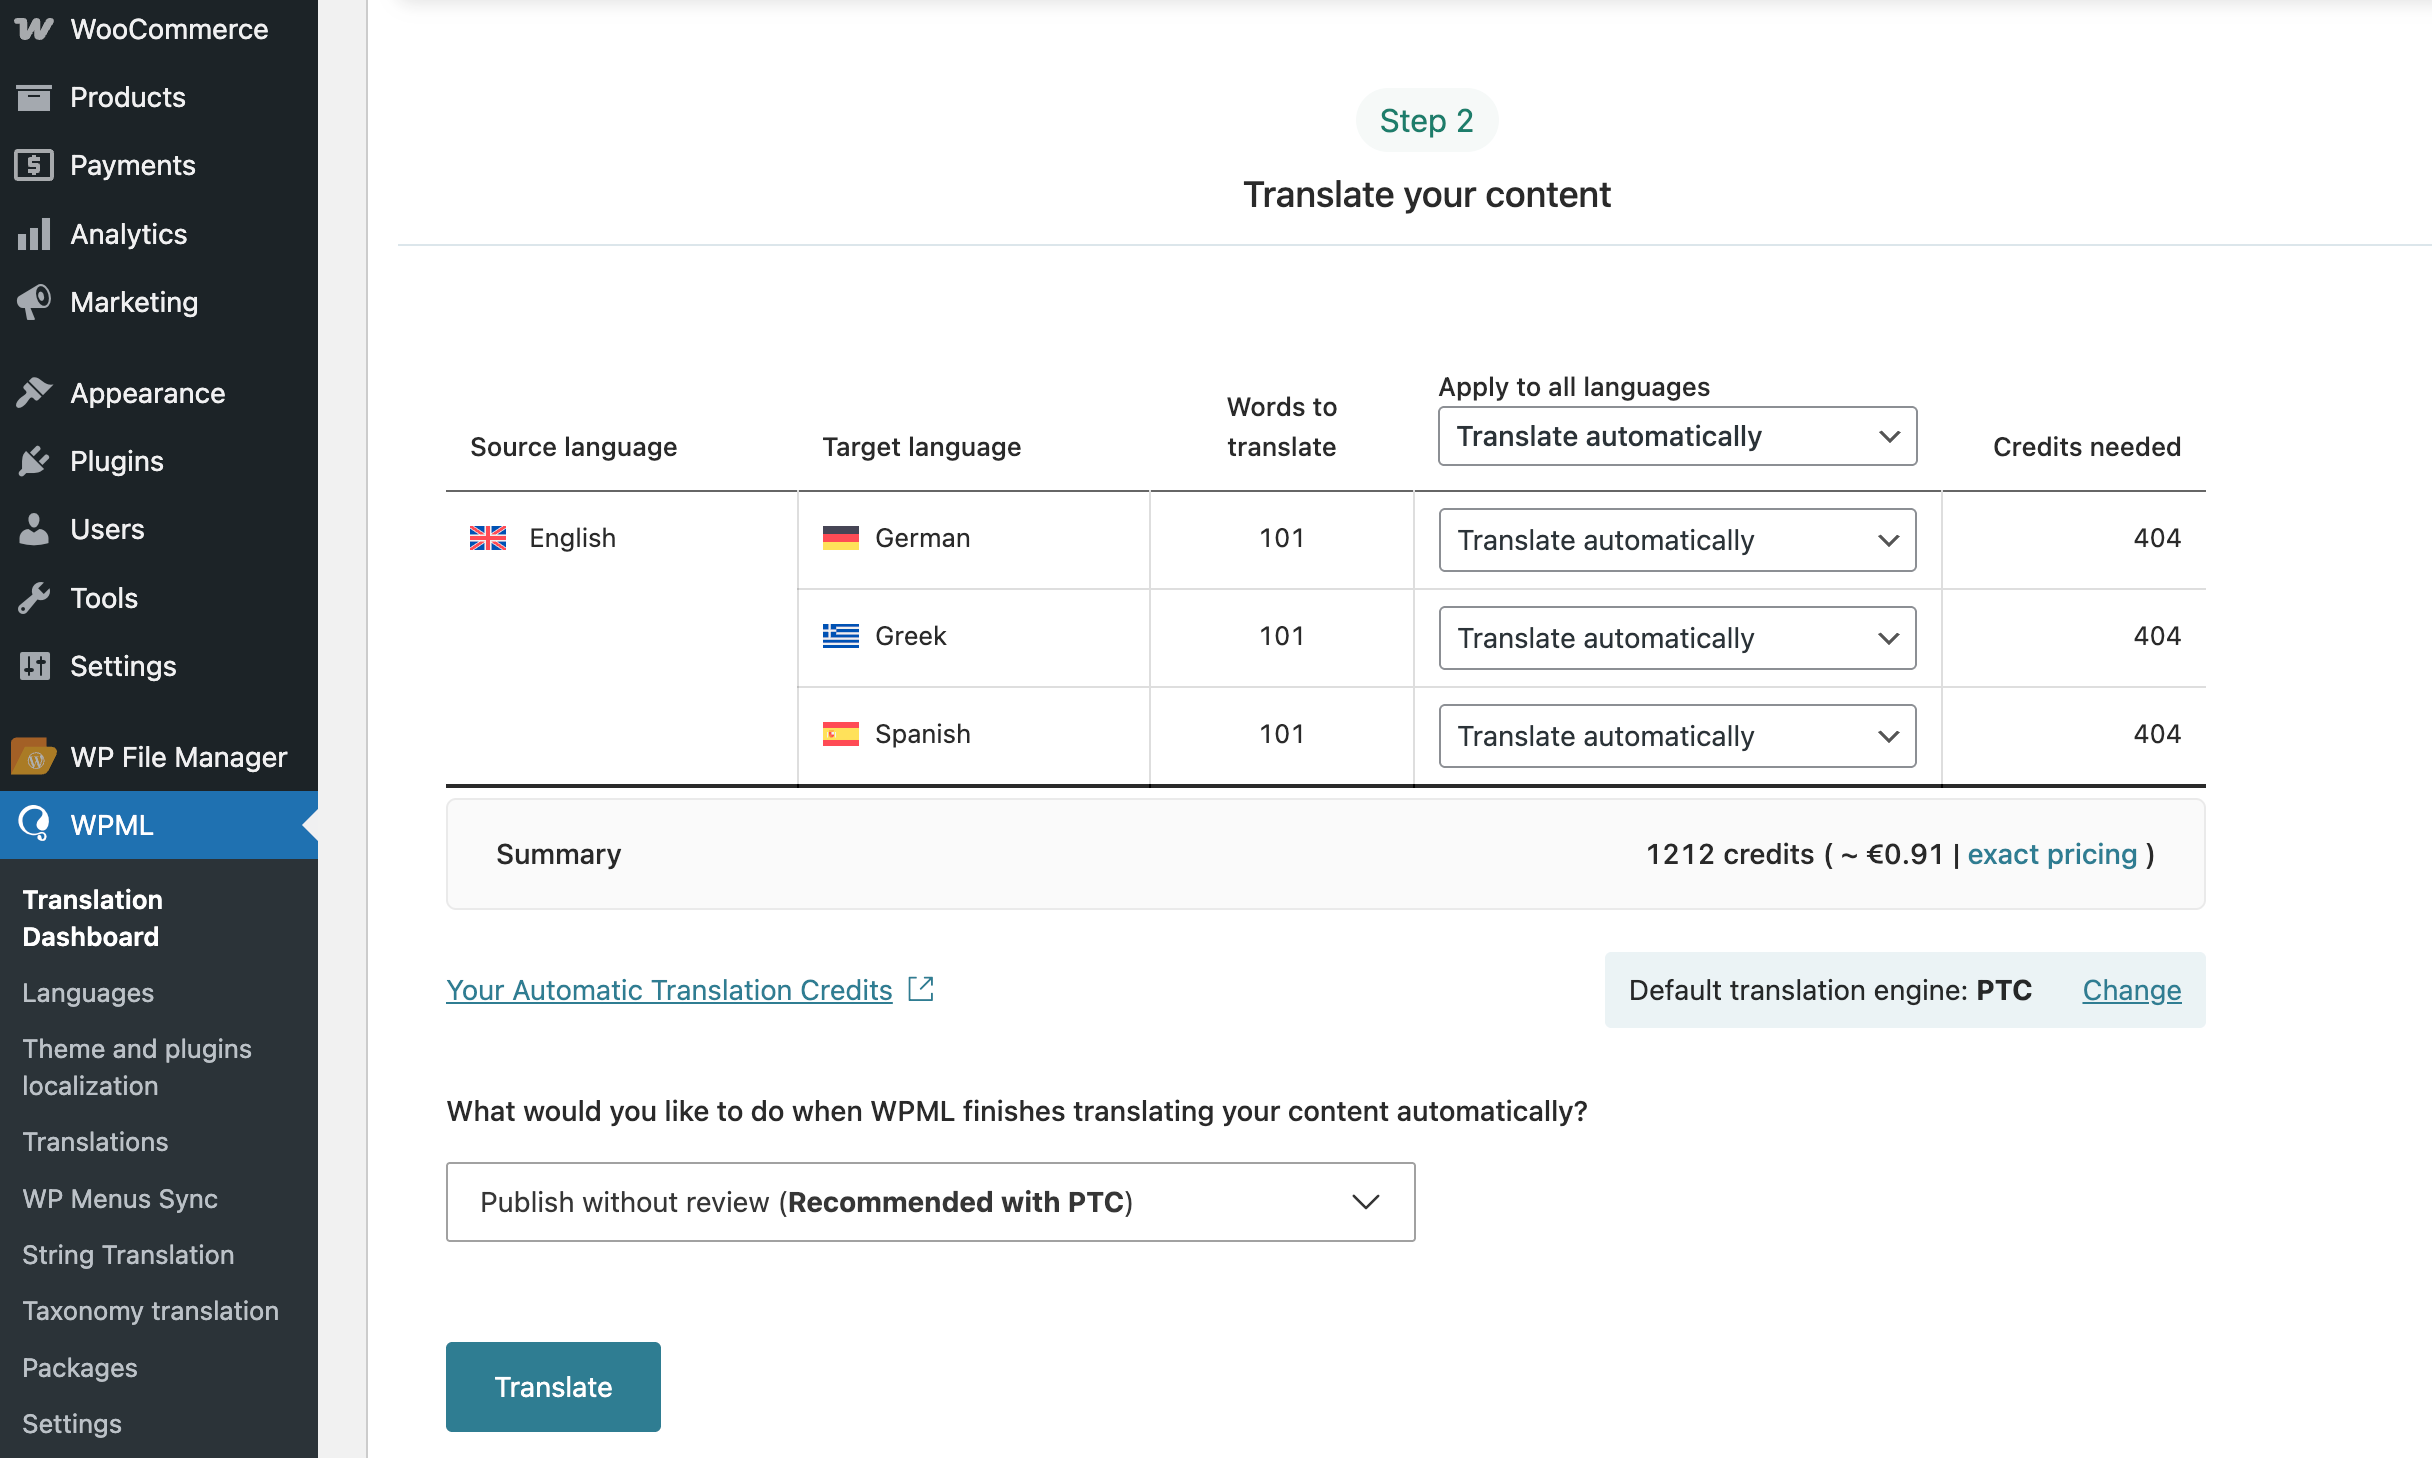
WPML recommends translating with the Private Translation Cloud (PTC) — their powerful AI translation engine. According to the WPML team, PTC uses site context to deliver human-quality translations. PTC even has a quality guarantee: if you’re unsatisfied with the AI translations, you get a refund.
WPML displays the exact amount of credits you need to translate the selected content and their cost on the Translation Dashboard.
Translating content also translates other attached elements, like navigation menus. This works for custom post types too: for example, translating a Tour translates the Tour Types you’ve added to that page, too.
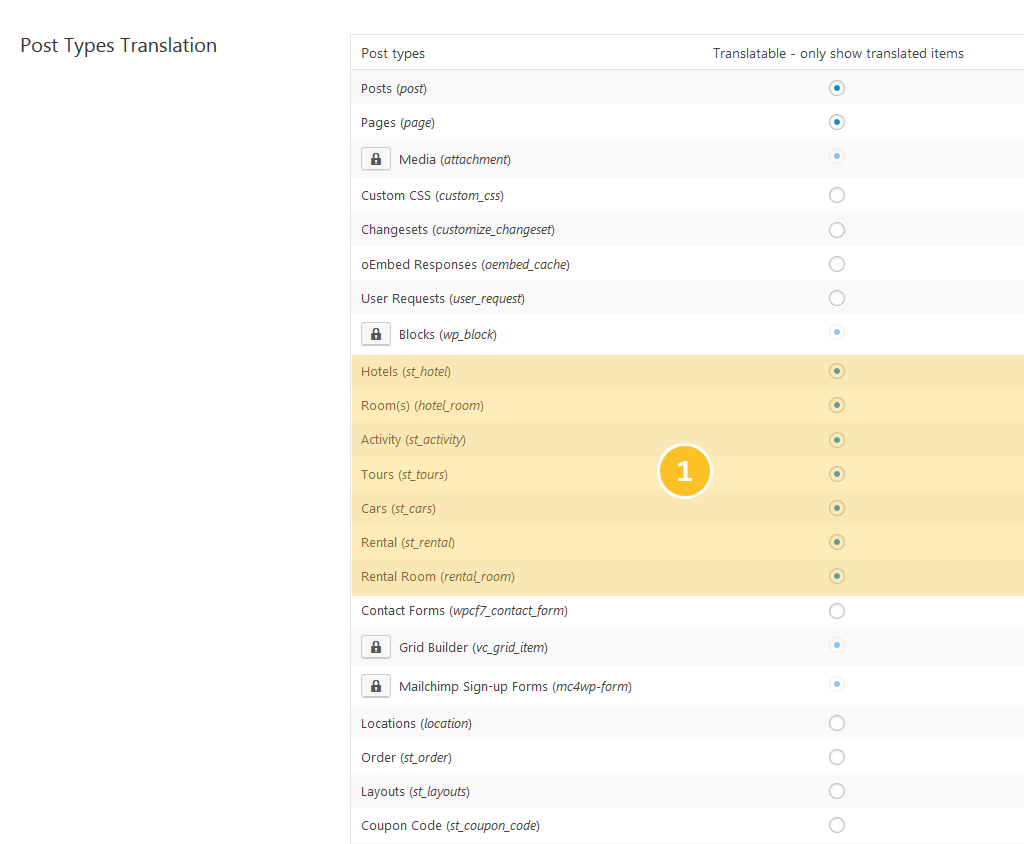
On the WPML> Settings, if you want to translate the content and title of service in Traveler, select the custom post to translate on Post Type Translation and save it.
Note: After translating Location, kindly run Traveler > Upgrade Data
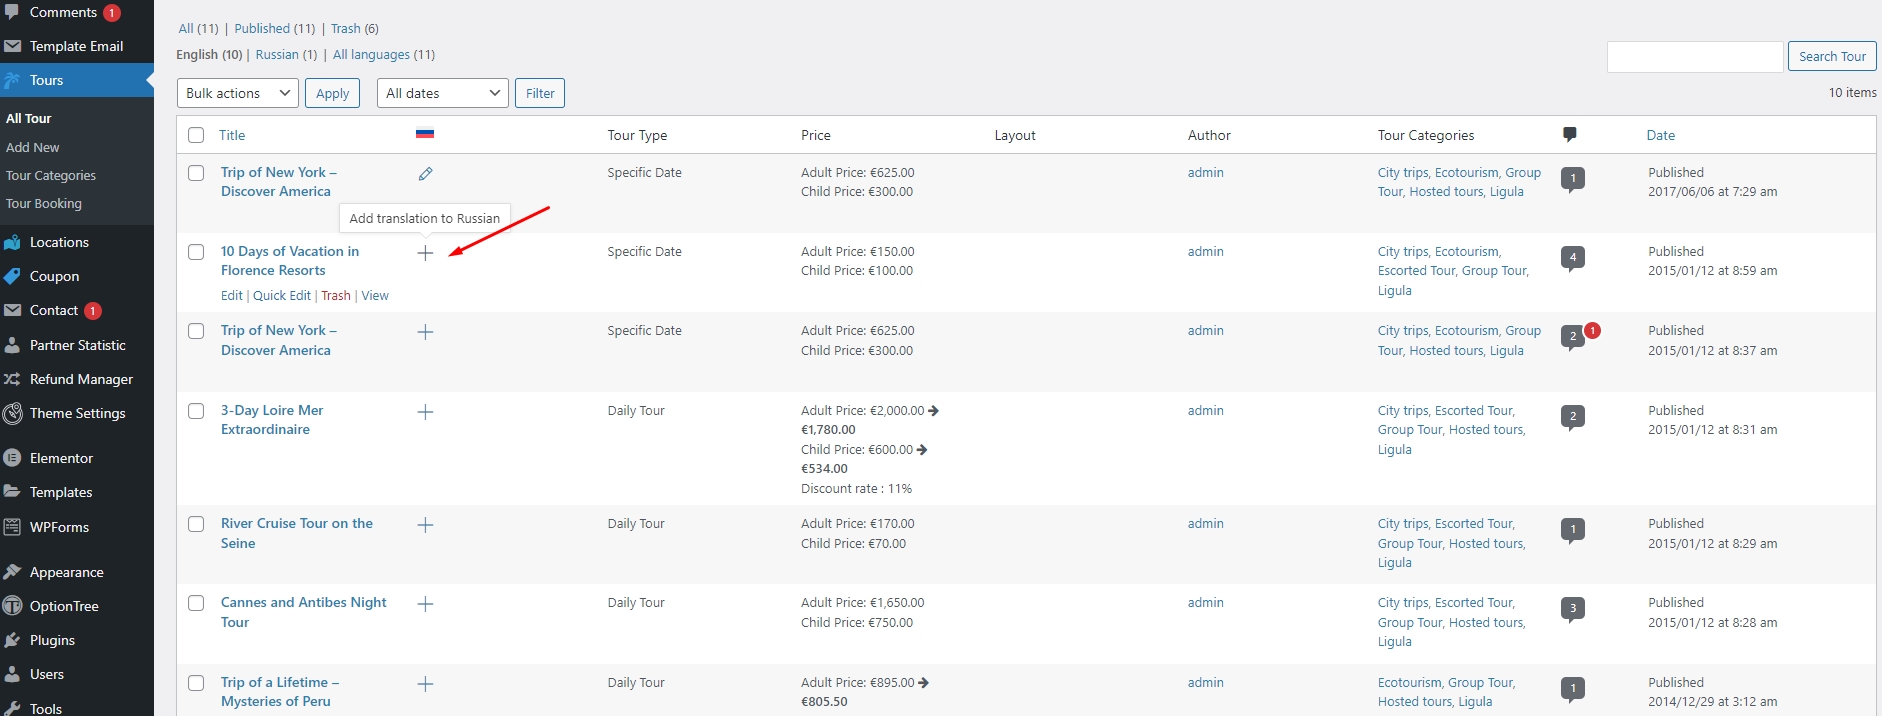
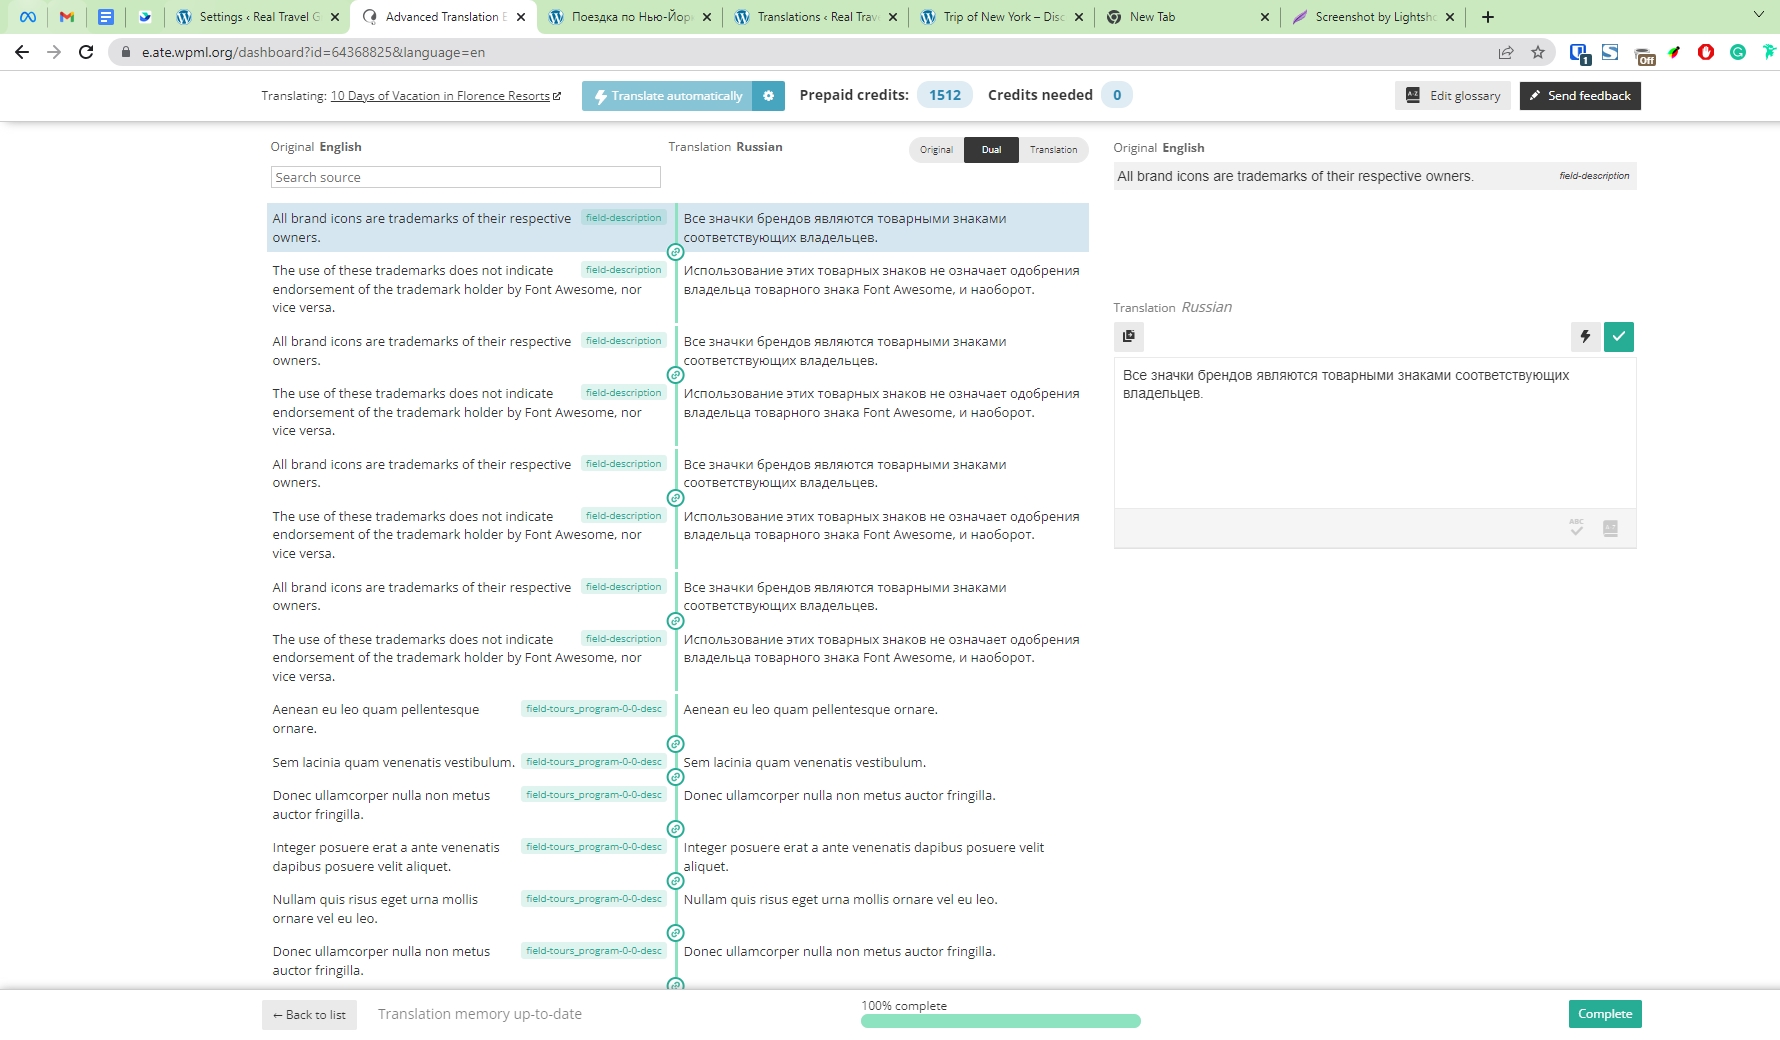
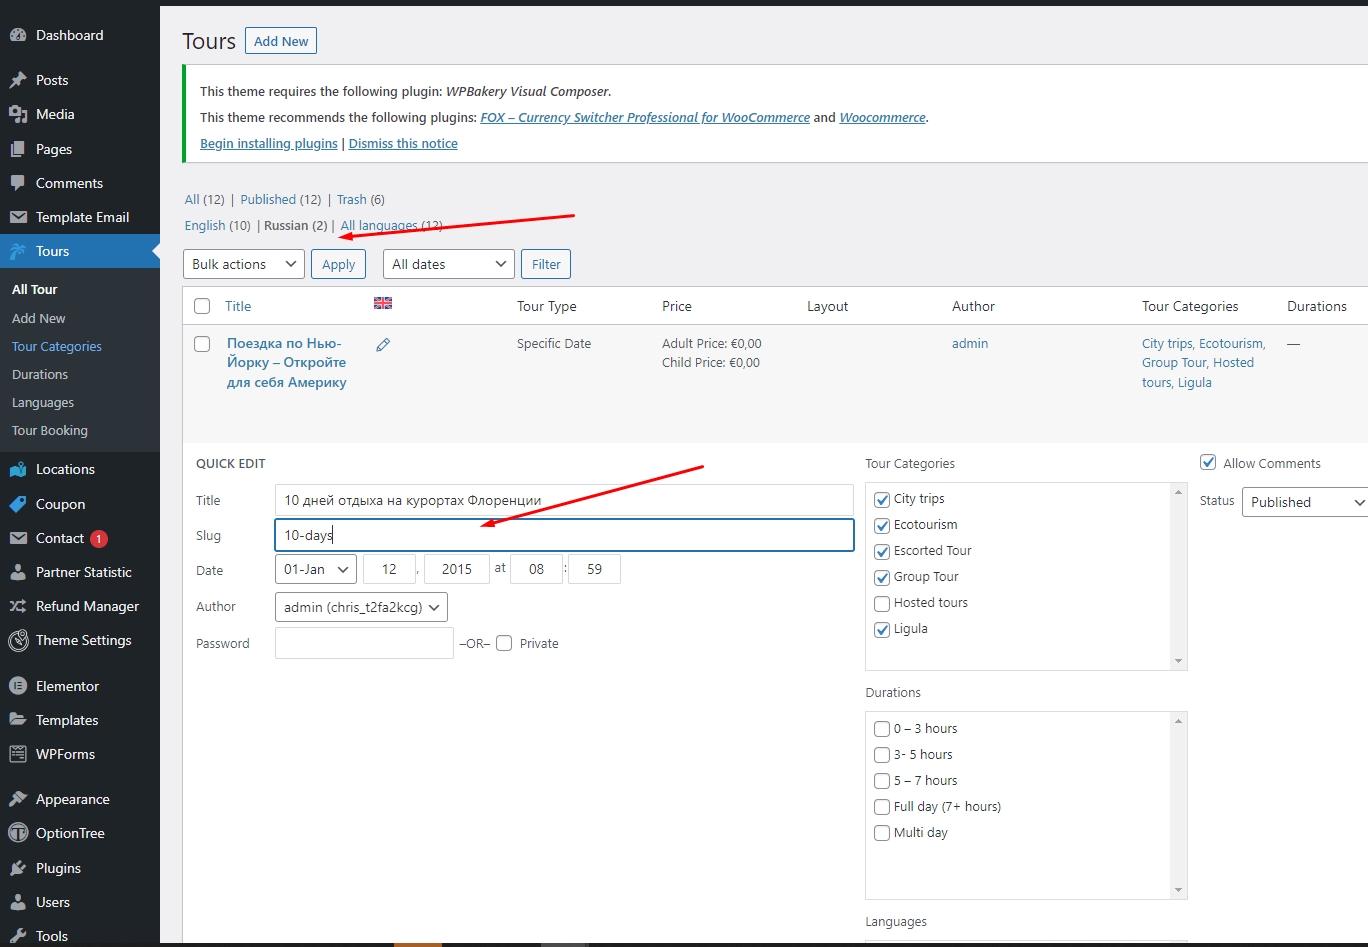
Don’t forget to change slug – avoid any special character
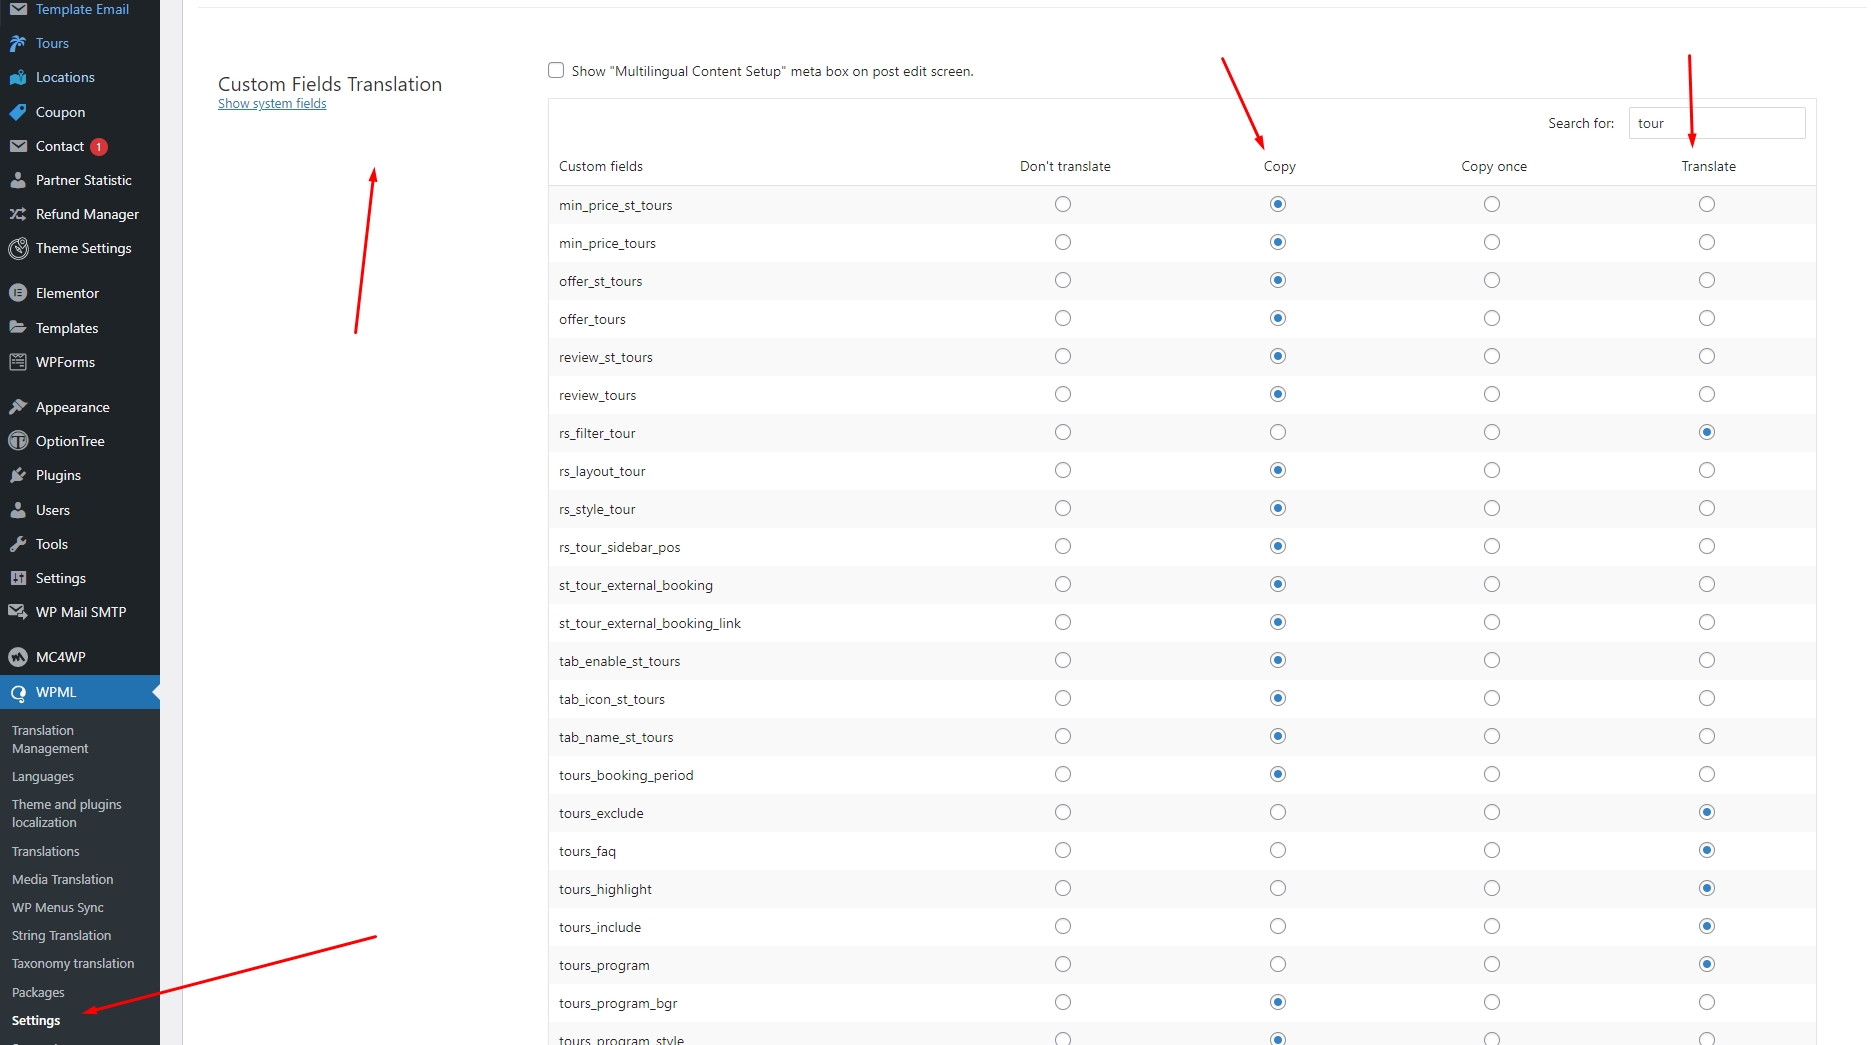
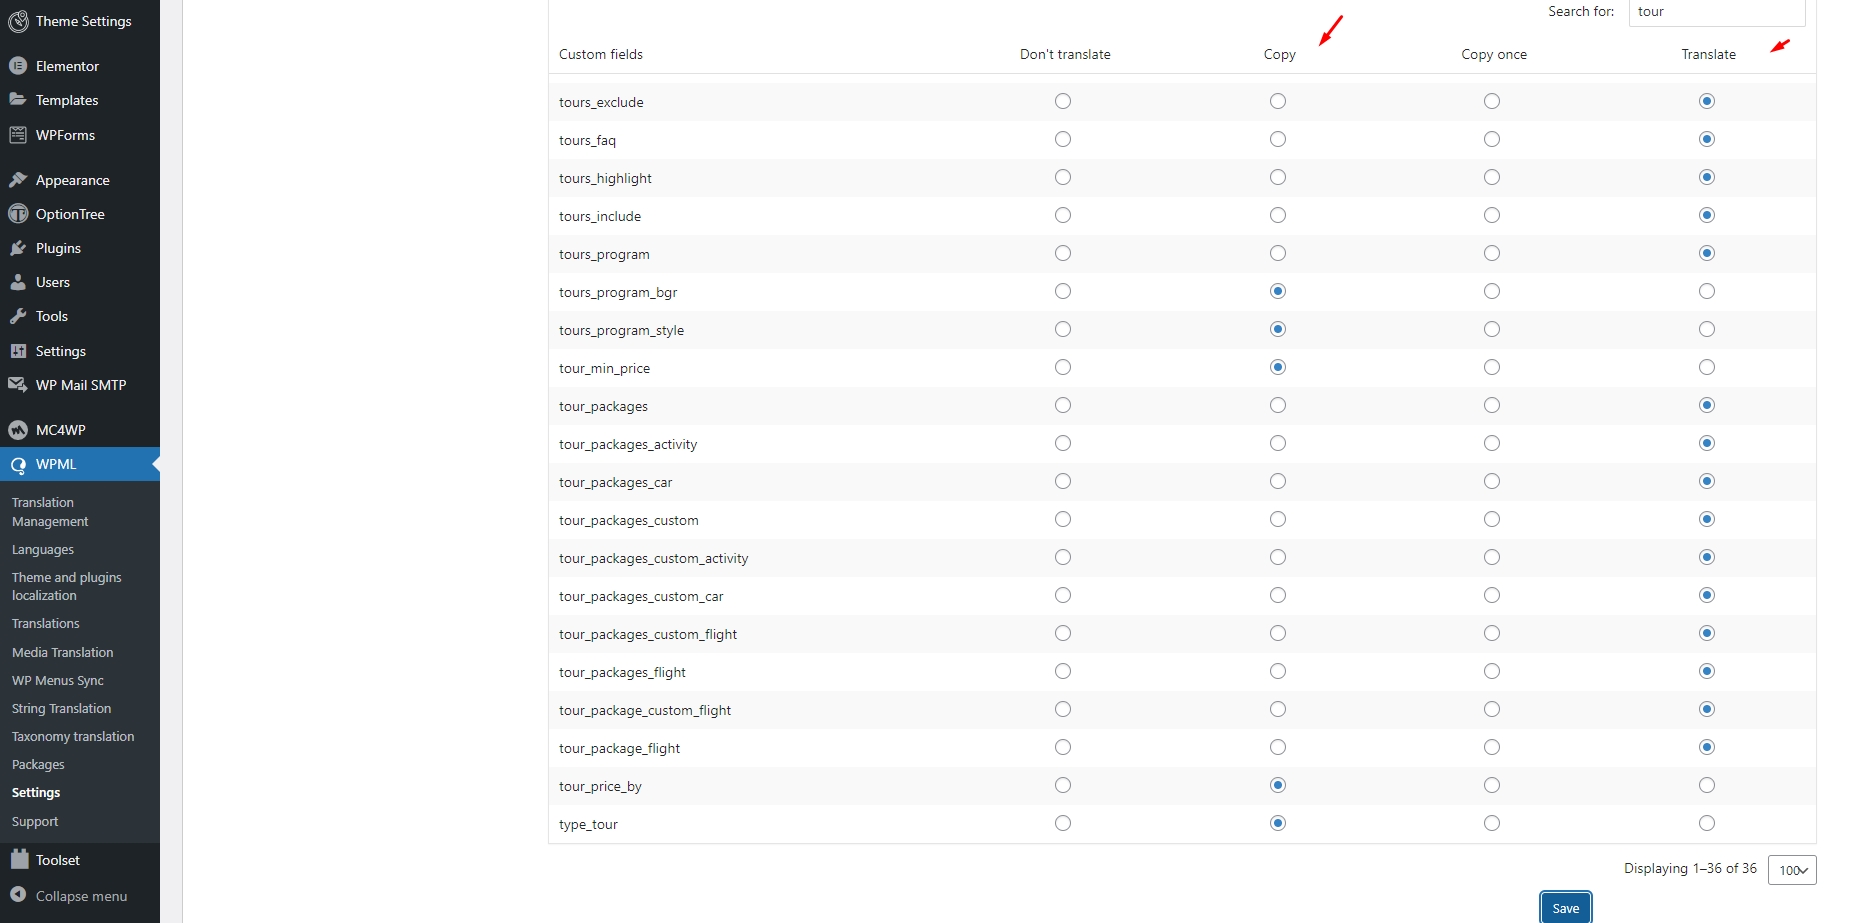
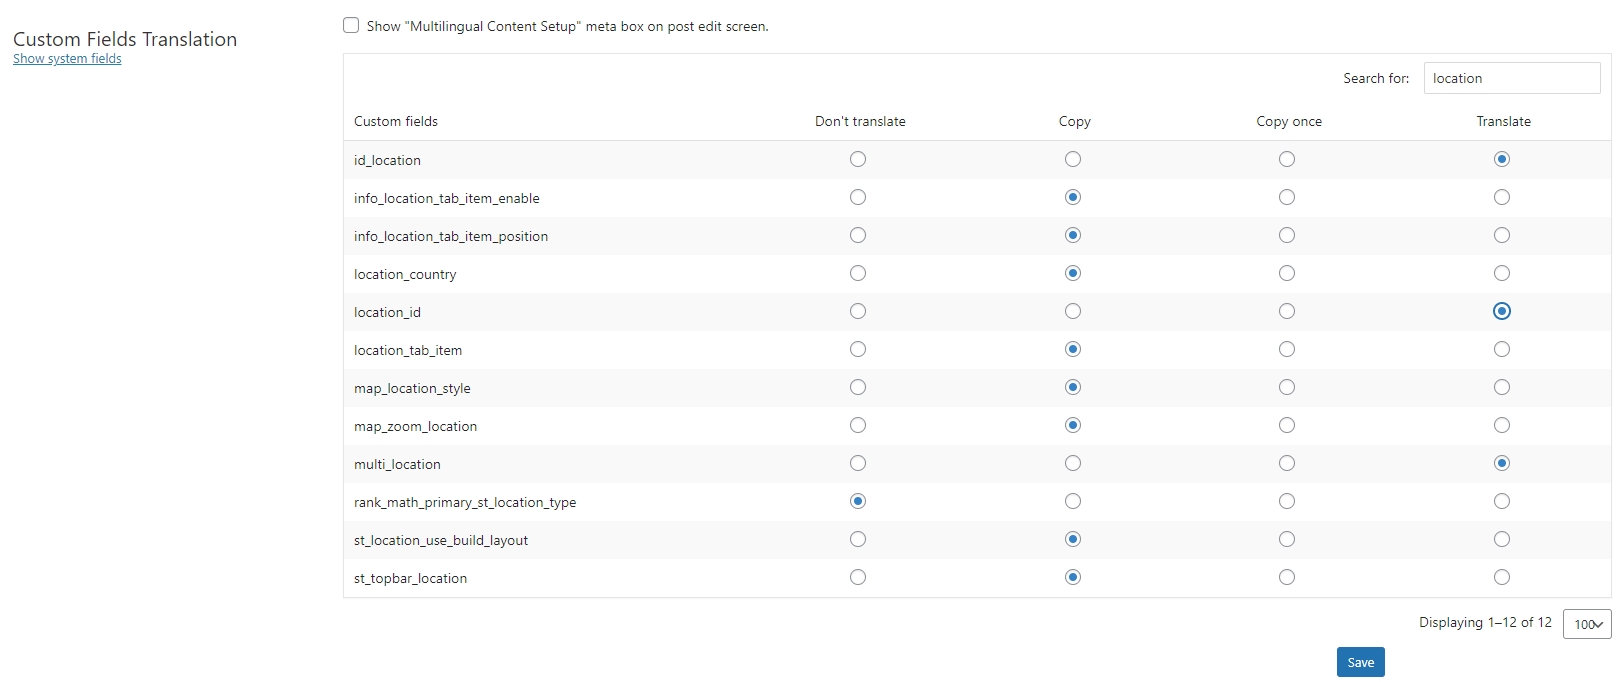
Navigate to WPML > Settings > Custom Fields Translation then tick Show “Multilingual Content Setup” meta box on post edit screen. For those fields, set “Copy” as the default option. Set some fields to “Translate” if necessary.
For example, set field [st_custom_layout_new] to Copy for set same layout of Single Detailed Page in each language.
Same for contact_email, website, phone, fax, tour_price_by, adult_price, discount_by_people_type, hide_adult_in_booking_form, hide_children_in_booking_form, hide_infant_in_booking_form, disable_adult_name, disable_children_name, disable_infant_name, discount, discount_type, deposit_payment_status, deposit_payment_amount


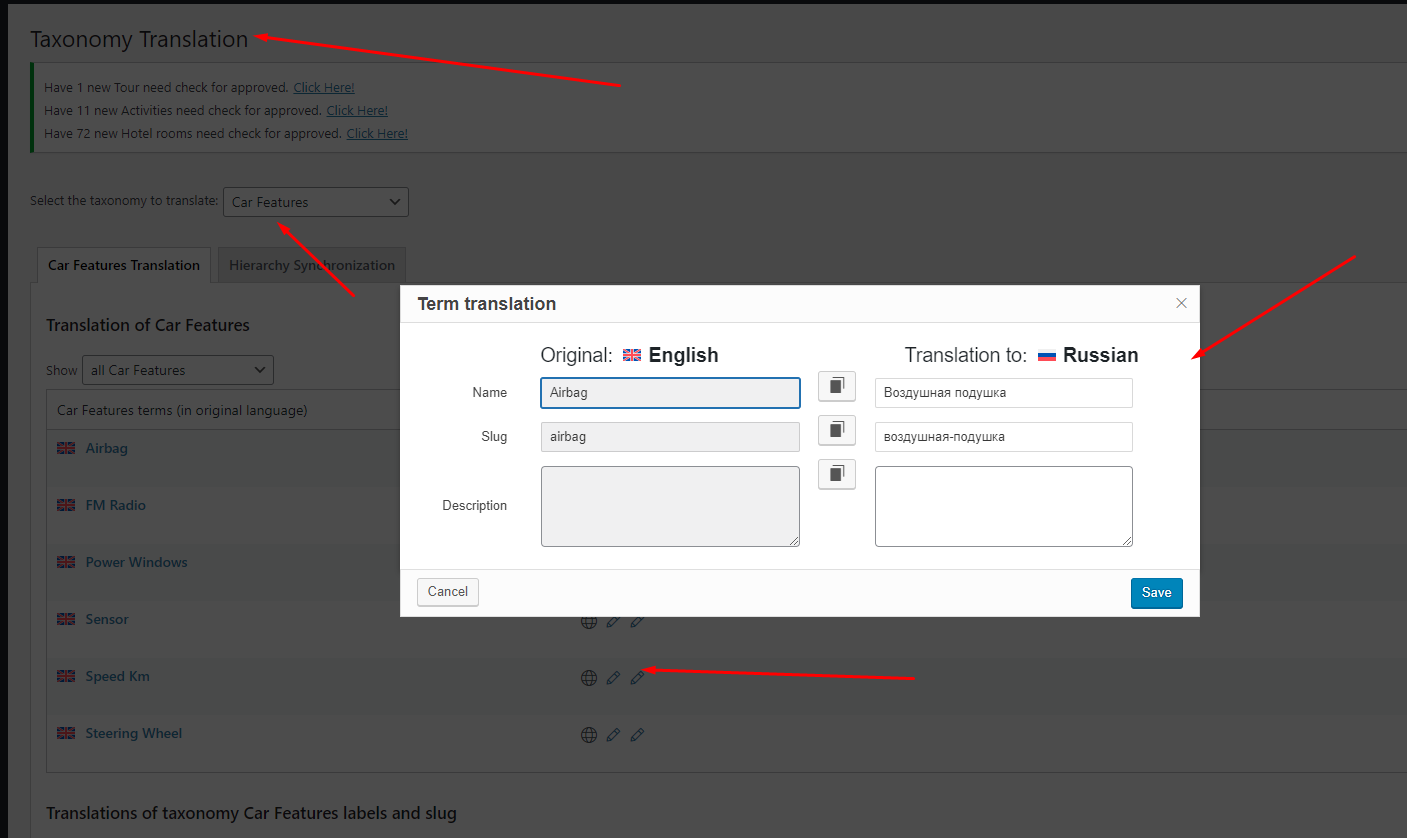
The Attribute(Taxonomy)’s name can be translated through WPAdmin > Traveler > Attributes such as Hotel Theme, Hotel Facilities, Activity Types, Amenities…
Just change language in the WPAdmin Bar then edit attributes Name in other language


Moreover, to translate each term inside Attribute(Taxonomy), such as Air Conditioning, Airport Transport, Fitness Center, Flat Tv… inside to Hotel Facilities

Apart from the main content that comes from posts, pages, and articles, there are texts coming from the theme and certain plugins.
For example, a policy on a hotel page consists of the policy content and the title “Hotel Policies”. The title “Hotel Policies” is a text (string) coming from the Traveler theme and you need to translate it separately from the content.
By default, WPML picks up these strings as you visit your site’s pages on the front-end. So, make sure you’ve visited the pages you’re translating and follow these steps to translate additional texts:
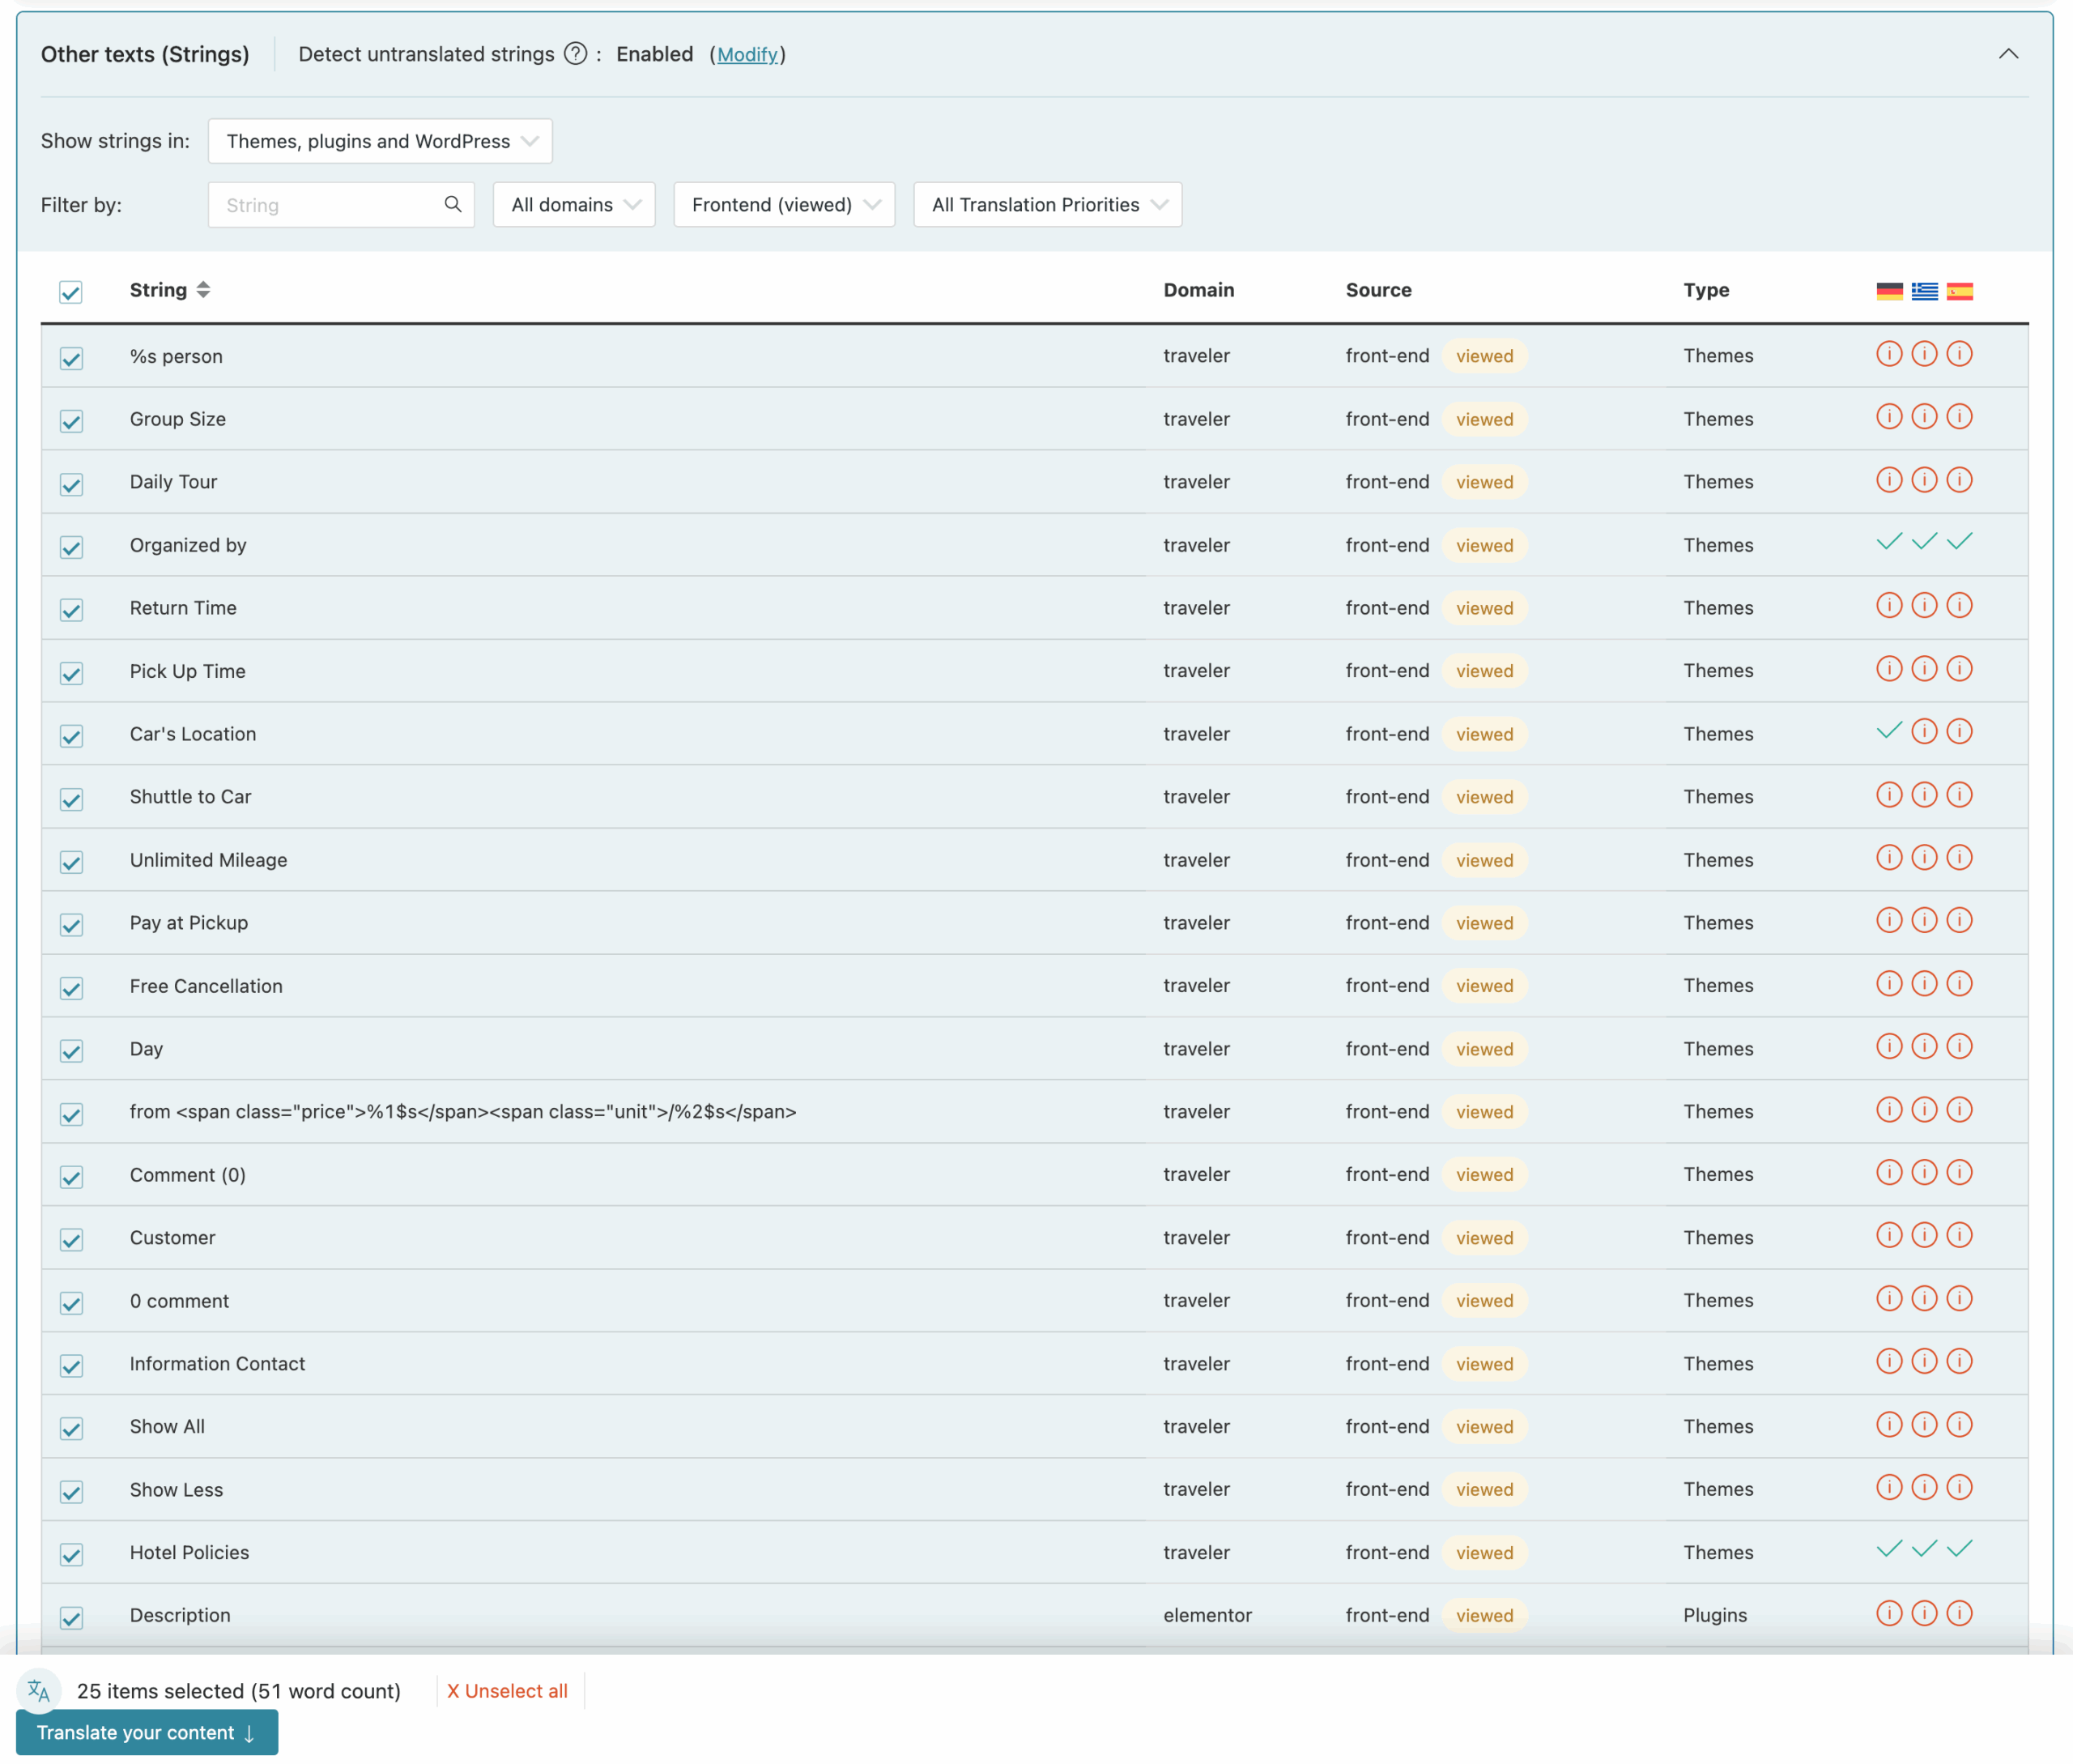
If you want to translate only specific strings, you can use the search function in this section.
If you want to review all translations at the same time, find them under WPML > Translations. To edit a particular translation, visit the translated page on the frontend and click on Edit Translation to open WPML’s Advanced Translation Editor.
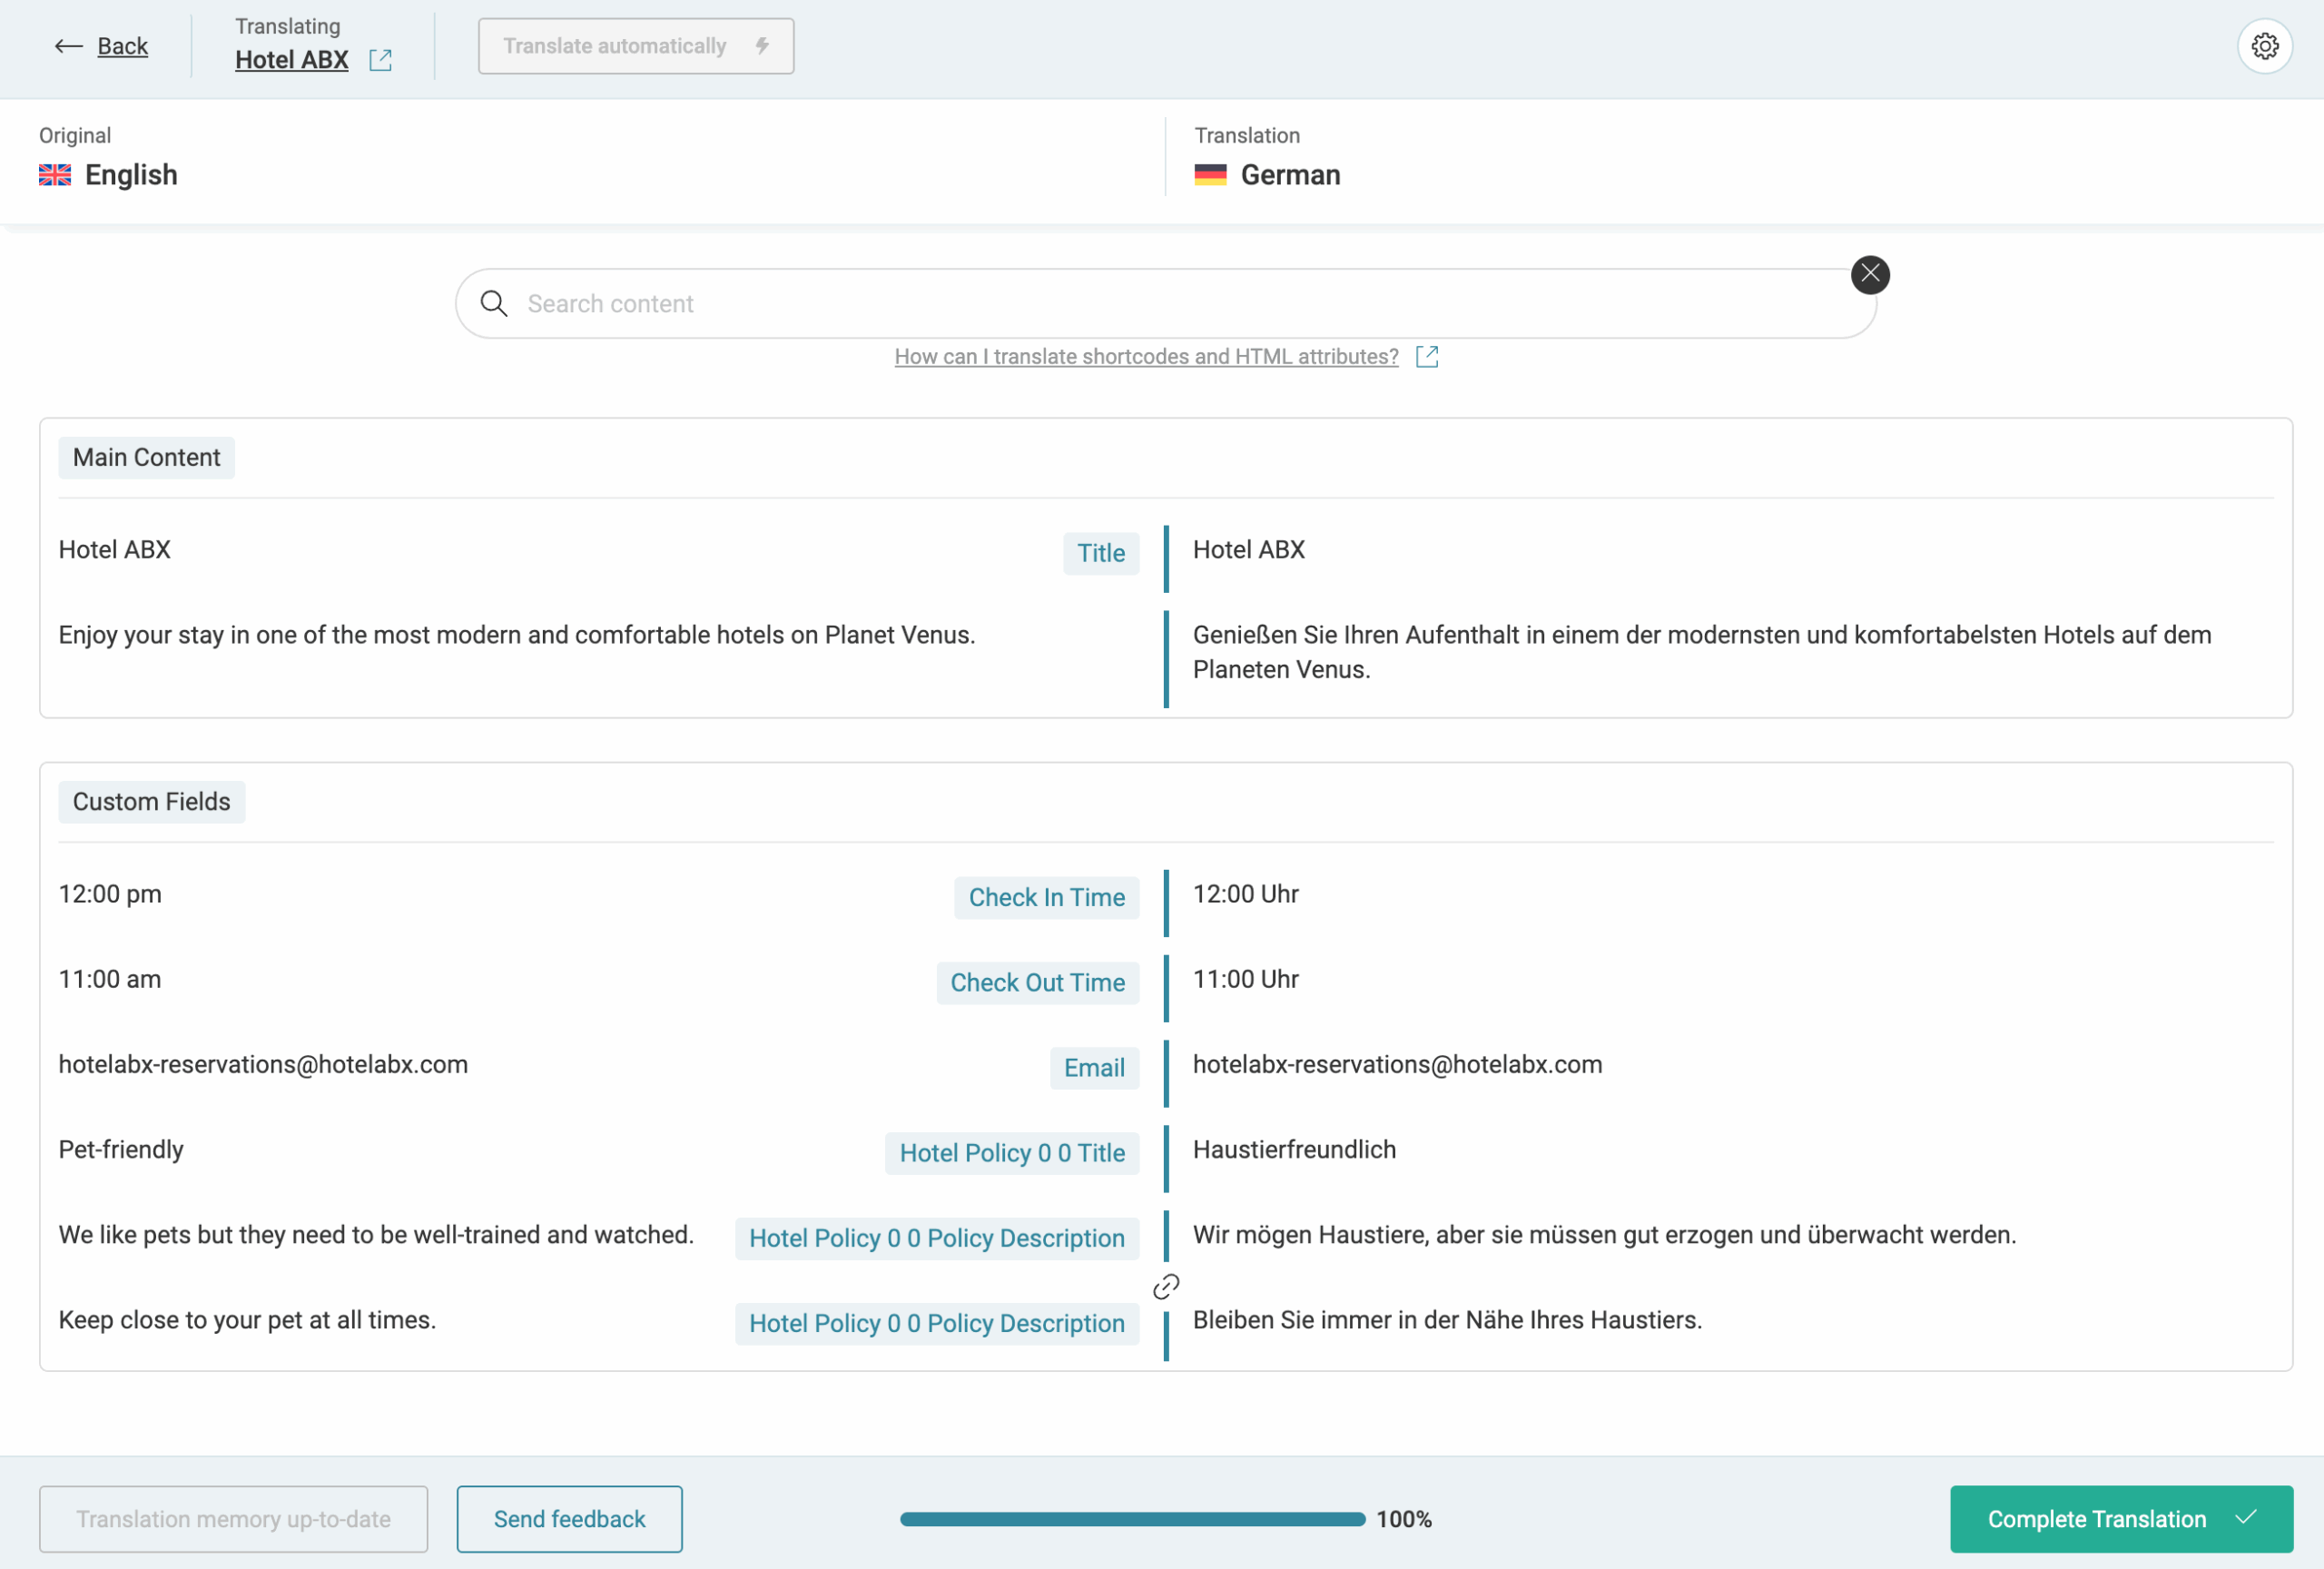
If you have a question or issue when using WPML, reach out to WPML’s support team.
In cases when you want to reset WPML and remove plugin data completely, you can follow the steps in WPML’s reset guide.
The ‘Reset’ action will deactivate the WPML plugin after it deletes the WPML tables (tables with the ‘icl_’ prefix) from the database. The action will NOT delete any content (posts, taxonomy terms etc.). It only affects translation and language information that WPML associates with each content type.
Please note that all translations you have sent to remote translation services will be lost if you reset WPML’s data. They cannot be recovered later. If you are using the Advanced Translation Editor, you will lose the translations that are in progress, as well as the existing translation memory and glossary. You will also lose access to purchases, invoices, and history related to your work with the Advanced Translation Editor.
Navigate to WPAdmin > WPML > Support > Troubleshooting > Reset then tick I am about to reset all translation and language data. After all, click to Reset and deactivate WPML
Please note that all locations must be translated into every language on your website.
For instance, if your website supports 3 languages and has 40 locations, all 40 locations need to be translated into each of the 3 languages. Once translations are complete, run Traveler > Upgrade Data.
If you have WooCommerce set up on your site, you can also install the WPML Multilingual & Multicurrency for WooCommerce plugin.
This plugin works alongside WPML to translate parts of your online store (such as shipping options). You can also use it on its own to add multicurrency functionality to your site.
You can install it the same way as WPML through the OTGS Installer and set it up easily by going to WooCommerce > WPML Multilingual & Multicurrency for WooCommerce.
Source: https://wpml.org/faq/nginx-server-settings/
If your site uses NGINX and your language URL format is set to Different languages in directories, you may see a 404 error when trying to access a login or registration page in a secondary language.
To avoid this error, you need to adjust your NGINX settings. Because NGINX can’t access your htaccess file, you need to add the following rewrite rules to your NGINX settings:
rewrite ^/xx/wp-login.php /wp-login.php break;
For example, if English, German, and French are active on your site, the NGINX rules would be:
rewrite ^/en/wp-login.php /wp-login.php break;
rewrite ^/de/wp-login.php /wp-login.php break;
rewrite ^/fr/wp-login.php /wp-login.php break;
Traveler design by ShineCommerce © All rights reserved